
Have you wondered how the Gaggia Classic Pro functions under the hood?
Today, I will look at the circuit diagram for the Gaggia Classic Pro (SN035R model), and will attempt to explain this to you as simply as possible.
Without further to do, let me share my circuit diagram first.
There are quite a few diagrams for the Gaggia Classic Pro out there. Notably, Whole Latte Love has a very nice diagram for the purpose of servicing the machine.
It is very intuitive in the way that each of the components appear in the diagram as how they actually look in real life. Also the wires are shown as how they are physically connected with all the wire colors labeled. This makes for a very nice reference for when you are physically looking at the machine and trying to figure out what goes where.
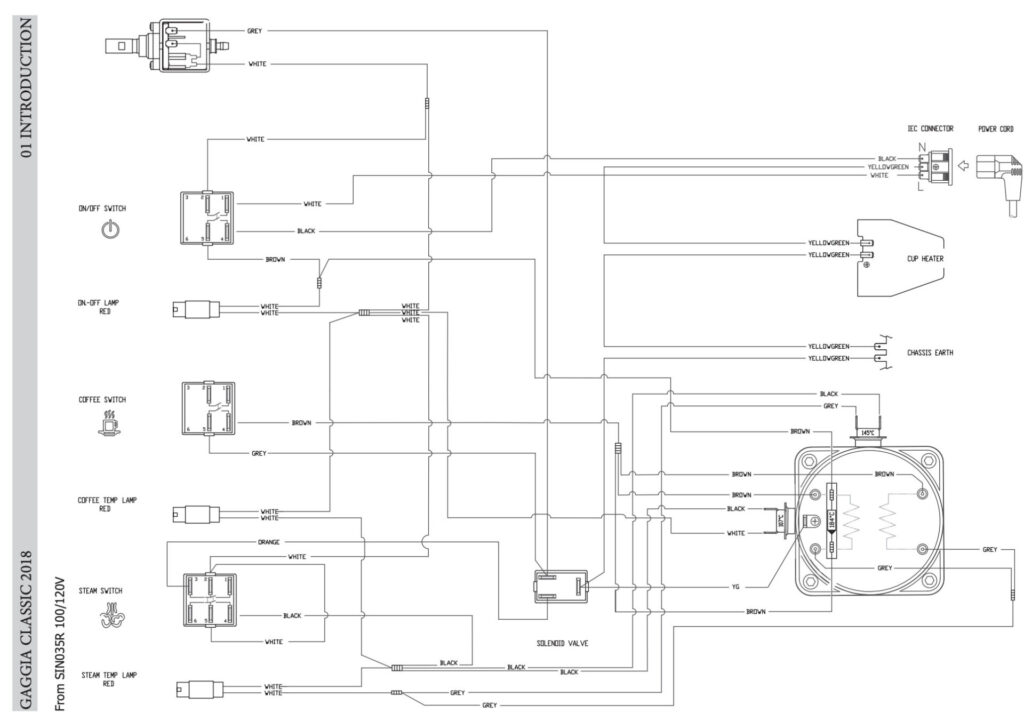
However as you may have noticed, it is rather complicated. It is near impossible to understand how each of the parts work together.
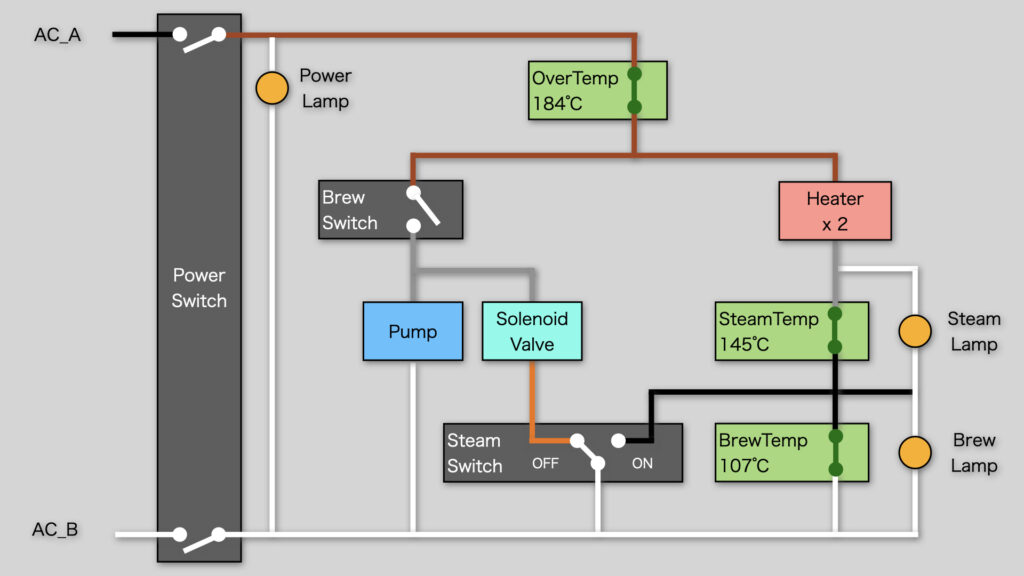
So based on their diagram, I set out to simplify and neatly rearrange it to make more sense out of it.
My diagram focuses on the functional aspects of the machine to find out which components become active under which conditions.
Looks much less intimidating right? But it actually is electrically equivalent to the diagram above. I have also kept the wire colors as they are labeled. However, I have removed the Ground connections (Yellow Green Wires) as they serve no purpose in how the circuit operates. (This does not mean you don’t need theses in your machine)
This will get real nerdy very quickly. Let me take you though the diagram step by step.
(By the way, I am an electrical engineer by profession, so I am reasonably confident about what I am talking about. But please take this with a grain of salt. I will be making a lot of simplifications for the sake of keeping things easy. This may upset the more technical readers, but if you see the simplifications, then I trust you will understand what really is going on.)
Power OFF State
Let’s start off with the easiest state of the machine, the Power OFF state.
This is when the Power Switch (at the very left) is OFF.
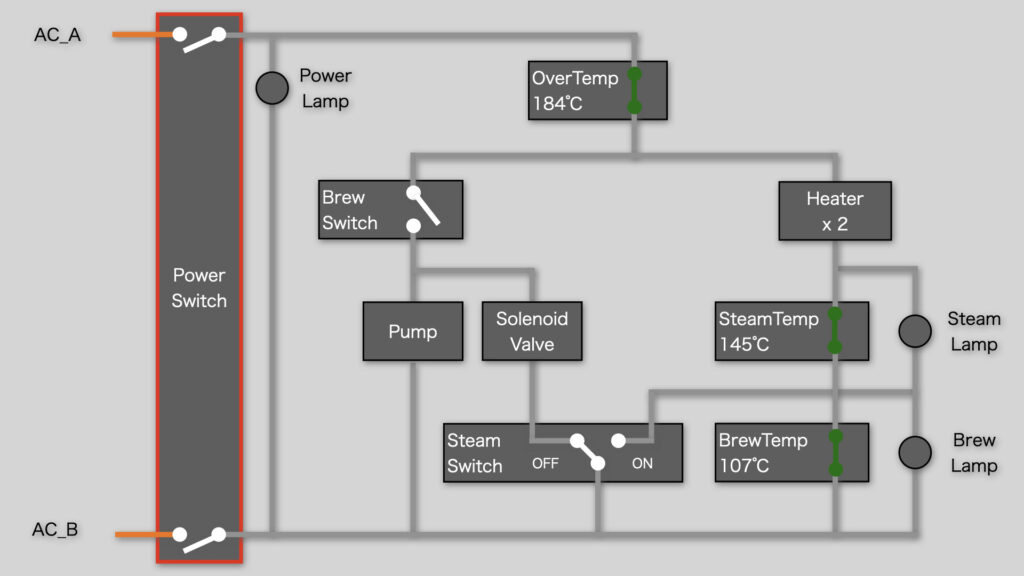
As seen in the diagram, the AC mains power comes in to the machine via AC_A and AC_B, but it is immediately cut off from the rest of the circuit with the Power Switch.
None of the circuit components get power, so they are all inactive.
Brew Heat Up State
The first thing you do with the machine is to turn the Power Switch ON. I will call this the Brew Heat Up State.
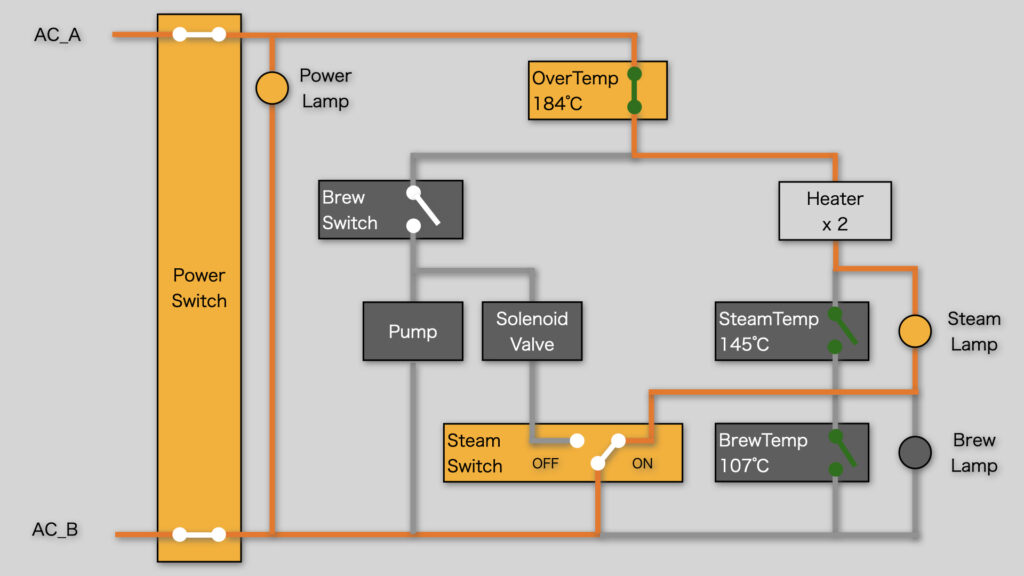
In this state, the Power Switch is ON, the Brew Switch is OFF, and the Steam Switch is OFF. The boiler is still cold.
By switching ON the Power Switch it lets current through to the orange lines.
In order to keep things as simple as possible, we can consider a component to be active when both ends of it are connected to an active orange line. For example the Power Lamp is connected to active lines on both sides so it turns ON. (The heater is a little bit different, I will explain later)
The Over Temp sensor is a safety component. It watches the boiler temperature and breaks the circuit off, when it gets too hot (over 184℃). But at normal operating temperatures lets power pass.
The Steam Temp sensor and Brew Temp sensors are also watching the boiler temperature. When the boiler is cold, they act as a ON switch and let power pass.
By having these two temp sensors ON (low temp), the heater gets power and starts to heat the boiler up.
You may have spotted that the Steam and Brew Lamps seems like they should have active lines on both ends. However the Steam and Brew sensors provide a much easier path for electricity to flow. So no current is provided to these lamps and they stay OFF. (In more technical terms they are shorted out).
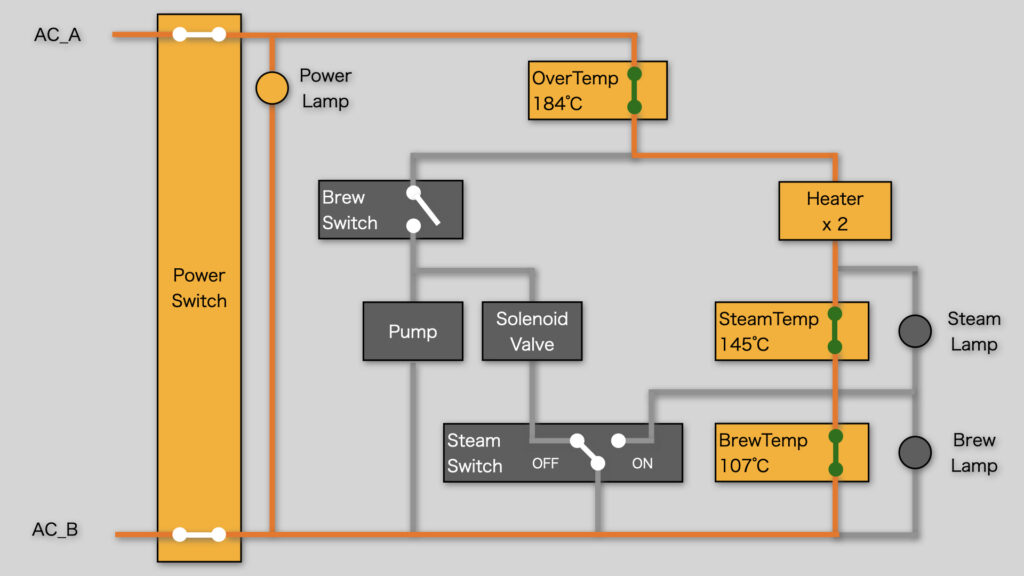
Brew Ready State
After a while, the boiler will heat up enough to be ready to brew.
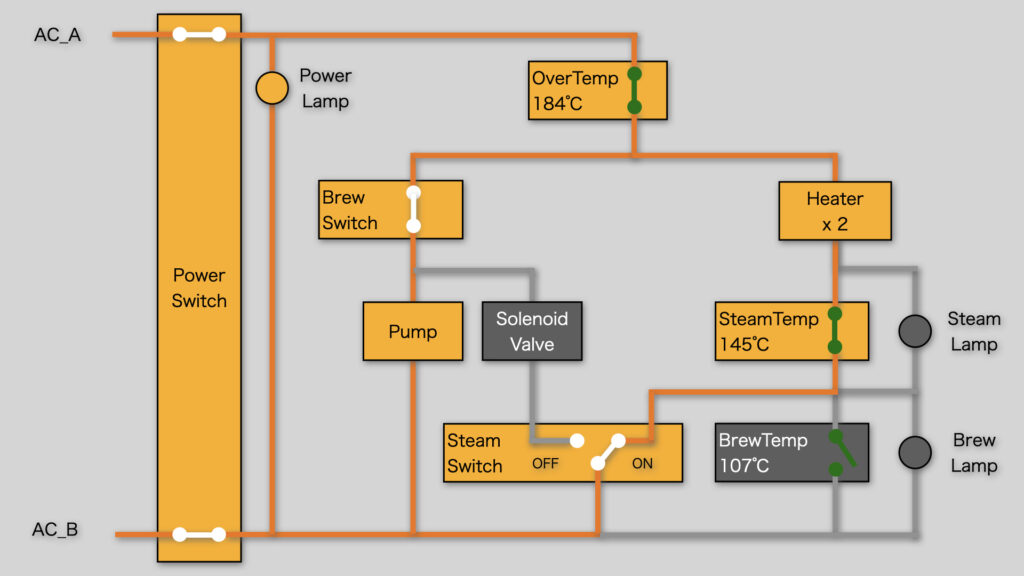
In this state, the Power Switch is ON, the Brew Switch is OFF, and the Steam Switch is OFF. The boiler above the brew temp, but below the steam temp.
When the boiler gets above the Brew Temp sensor’s threshold, the Brew Temp sensor cuts OFF.
This forces the current to flow through the Brew Lamp path, thus turning it ON.
This path through the Brew Lamp is actually a much more resistive path than through the Brew Temp sensor. This causes the Heater to loose power turning it OFF. (For the tech people, the brew lamp takes most of the voltage drop since it has a higher resistance than the heater, reducing the current through the path, and the heat output)
The Heater turns OFF in this state, so the boiler temp starts to slowly drop, eventually transitioning back to the Brew Heat Up State. The machine will cycle between the Brew Heat Up State and Brew Ready State, maintain a certain brew boiler temperature.
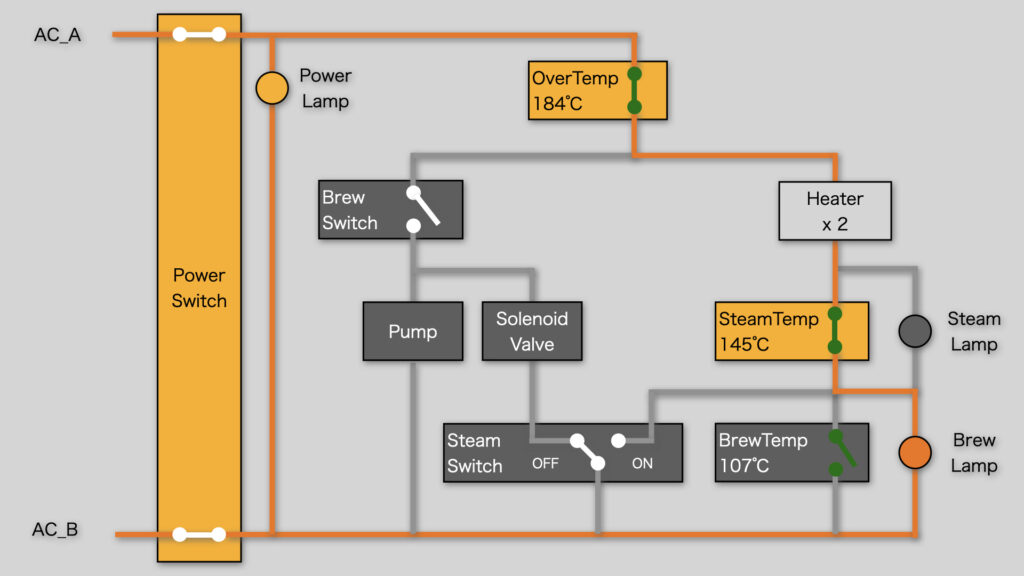
Brewing State
Once the boiler is up to temp, you will hit the Brew Switch. This is the Brewing State.
In this state, the Power Switch is ON, the Brew Switch is ON, and the Steam Switch is OFF. The boiler is below steam temp (it could be above or below brew temp).
When the Brew Switch is turned ON, it activates the Pump and the Solenoid Valve.
The Solenoid Valve in the active state opens up a path from the boiler to the group head. The Pump starts to drive water into the boiler, which in turn forces hot water to enter the basket.
Note that in this Brewing State, the Brew Lamp / Heater could be ON or OFF depending on the boiler temperature, as we saw in the Brew Heat Up State and Brew Ready State.
(The diagram shows the boiler above the brew temp, thus the lamp ON and heater OFF)
Once you finish pulling the shot, you will turn OFF the Brew Switch and return to the Brew Heat Up State or Brew Ready State.
Steam Heat Up State
When you what to steam, you will turn ON the Steam Switch and wait for the boiler to get to temperature. This is the Steam Heat Up State.
In this state, the Power Switch is ON, the Brew Switch is OFF, and the Steam Switch is ON. The boiler is below steam temp.
By switching ON the Steam Switch, you bypass both the Brew Temp sensor and Brew Lamps. So this effectively ignores the Brew Temp switch and turns OFF the Brew Lamp.
Now the Steam Temp sensor is connected until the boiler gets up to steaming temp. Both Lamps are off, so the Heater is turned ON.
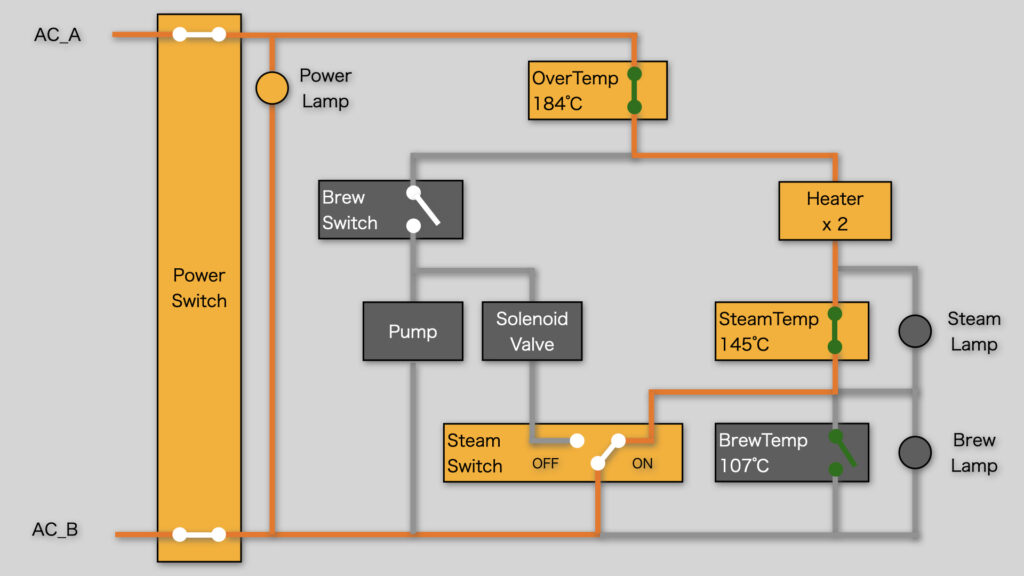
Steam Ready State
Finally when the boiler gets up to steaming temperature, we are in the Steam Ready State.
In this state, the Power Switch is ON, the Brew Switch is OFF, and the Steam Switch is ON. The boiler is above steam temp.
The Steam Temp sensor cuts OFF, which turns on the Steam Lamp. The added resistance to the path turns OFF the Heater.
Again, the machine cycles between the Steam Heat Up state and Steam Ready state to maintain steaming temperature in the boiler, while preventing it from getting too hot.
One thing to note is that there is no electrical state for Steaming. When you steam, you open the steam valve to get steam escape out from the boiler. This has no effect on the electrical state of the machine. It stays cycling between the Steam Heat Up state and Steam Ready state.
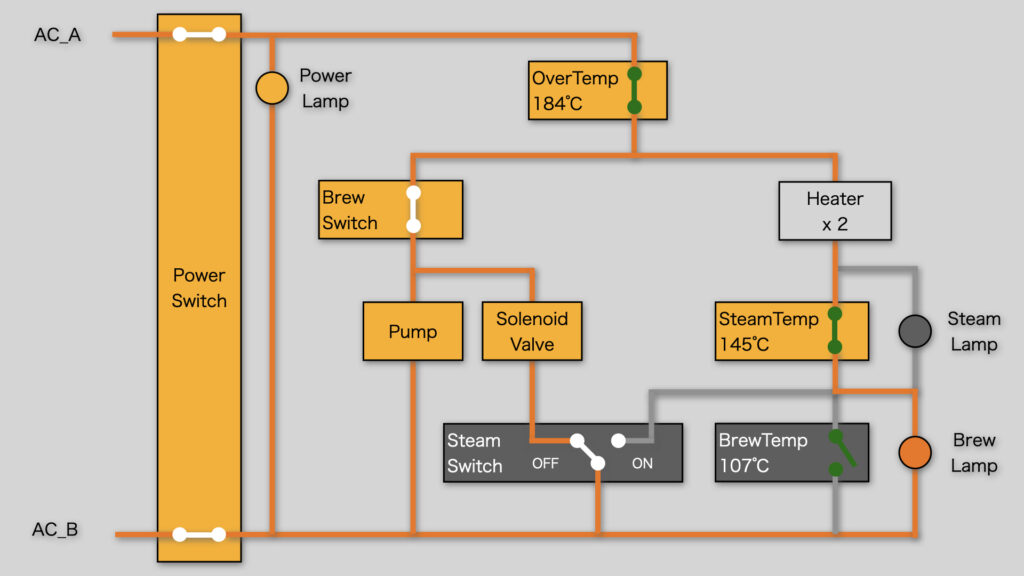
Bonus State : Hot Water from Steam Wand
So we have covered the states that you are most likely to use. But you may be wondering what would happen when both the Brew Switch and Steam Switch ON.
Well its easy when you understand the circuit diagram.
The Steam Switch being ON causes two things. The Heater will turn ON to heat the boiler up to steaming temperature. And the Solenoid Valve will be disable, thus closing off path from the boiler to the group head.
The Brew Switch turned ON will activate the Pump.
So what will happen is, the Pump will force water into the boiler, but it will have no where to go. The boiler will keep heating up to steaming temperature. This isn’t a very useful state.
But if you open the steam valve in this state, it becomes a bit useful. The pump will force the steam and hot water in the boiler to exit through the steam wand. You will probably get some steam at the start, but since you are driving cold water into the boiler, the steam will not continue for long. After that you will get hot water coming out of the steam wand.
This could be a useful state if you want to make Americanos. But I feel it much more easier to get my hot water out of the group head in the Brewing State.
So that was a lot. Thank you very much for sticking around to the end. Hopefully this has helpful for some of you intense coffee nerds!


コメント